Whether you’re working with athletes, elderly patients, or those recovering from injury, gait analysis is one of the most fundamental assessments in physiotherapy and biomechanics. It gives you insights into movement efficiency, compensations, strength imbalances, and even neurological function. Many clinicians rely on observational gait analysis as part of the physical therapy assessment. However, without a clear gait analysis checklist or structure, it’s easy to miss small but important details.
This simple gait analysis checklist breaks gait down into key components that you can assess quickly and efficiently, even without high-end equipment.
Gait analysis checklist: Understanding gait phases
Each step in walking or running involves two major phases:
Stance Phase (60% of gait cycle): Foot is on the ground. Priorities for this phase include good shock absorption, weight bearing, balance and propulsion.
Swing Phase (40% of gait cycle): Foot is in the air. This phase usually is a test of ground clearance and limb advancement.
Each of these phases can be further broken down, but for clinical use, focusing on initial contact (foot strike), midstance (single limb support), and terminal swing gives plenty of actionable information.
Gait analysis checklist: What to look for during gait assessment
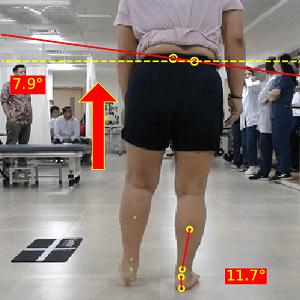
1. Head and Trunk Alignment
- Is the head upright and facing forward?
- Is there any excessive trunk lean or rotation to one side or bilaterally? Lateral shifts or side-bending can indicate pain avoidance, weakness of hip abductors, or habit.
2. Pelvic Control
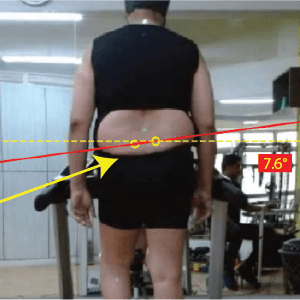
- This is most useful to evaluate during single limb support. Watch for the pelvis dropping on the swing phase side. Excessive drop may point to weak hip abductors (especially gluteus medius) on the stance leg. A “Trendelenburg gait” is a classic example.
- In some cases, you might also observe a pelvis hike, which is often a compensation for poor ground clearance due to a structural or functional leg length discrepancy.
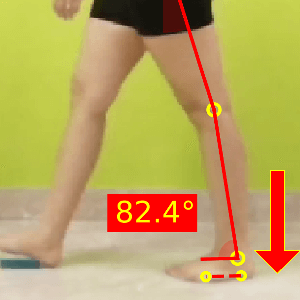
3. Hip Motion
- Is the hip extending fully during terminal stance (corresponds to opposite initial contact)? Limited extension can lead to compensations like lumbar lordosis or increased knee flexion.
- Also, observe for hip circumduction or hip hiking during the swing phase, which is often done to compensate for poor ground clearance.
4. Knee Behavior
- At initial contact: is the knee flexed at foot strike (~5°–10° in walking)? Knee hyperextension at initial contact may indicate poor eccentric control by hamstrings. On the contrary, increased knee flexion may indicate overactivity of hamstrings.
- During single limb support: Excessive straightening (hyperextension) may indicate quad weakness or pain avoidance.
- During swing: is the knee flexing adequately to allow toe clearance? Peak knee flexion is usually achieved by hip flexors in this phase.
5. Foot Strike and Progression
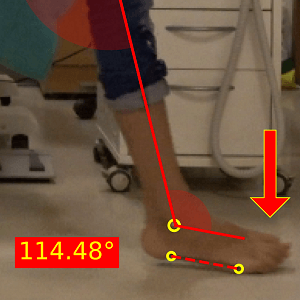
- Is the heel making first contact (for walking)? Forefoot strike patterns in walking are generally a result of poor eccentric activity of the dorsiflexors.
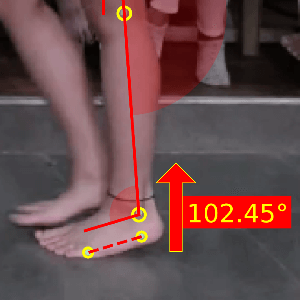
- Is there an early heel rise? In certain cases, the heel comes off the ground during mid-stance (single limb support). This may indicate overactivity of ankle plantarflexors.
- Is there a delayed heel rise? A heel rise, which happens after the opposite initial contact, may indicate reduced concentric activity of the gastrocnemius.
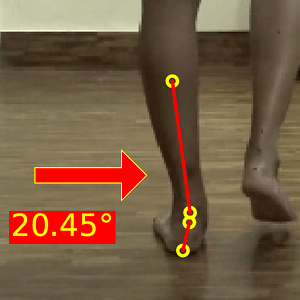
- Look for pronation/supination during single limb support. Excessive pronation could lead to medial knee and ankle issues; supination may increase stress-related injuries.
6. Step Symmetry
- Are both legs moving in a similar way?
- Is the stride length even on both sides?
- Look for asymmetrical step length, stance time, or arm swing—all signs of compensation or imbalance. Painful, weak, or unstable limbs often have a reduced stance time.
7. Cadence and Rhythm
- Is the pace smooth and rhythmical?
- Any halting, hesitation, or uneven steps can indicate coordination issues or motor control problems.
Gait analysis checklist: Tips for better observation
- View from front, back, and side. Each angle reveals different components of gait.
- Use a treadmill or a long corridor to observe multiple cycles.
- Record on video if possible; more reliable for gait analysis.
- Make notes on deviations, and compare over time to track improvements.
Why is it important to follow a systematic gait analysis checklist
Using a structured checklist for gait analysis:
- Improves your clinical decision-making
- Helps in tracking patient progress objectively
- Makes communication with patients easier (“Here’s what we’re working on and why”)
- Enhances treatment planning, especially for return-to-sport or balance training
ABOUT THE AUTHOR

GAYATRI SURESH (PT)
Gayatri Suresh (PT) is a Biomechanist who has completed her B.P.Th from DES College of Physiotherapy and M.P.T (Biomechanics) from SRM College of Physiotherapy, SRMIST. Her field of clinical expertise is in movement assessments through video analysis. Apart from her work at Auptimo, she works as a Clinical Specialist at Rehabilitation Research and Device Development, IIT Madras. She has won gold medals for her Research presentations and for securing First rank with distinction in her MPT degree respectively.