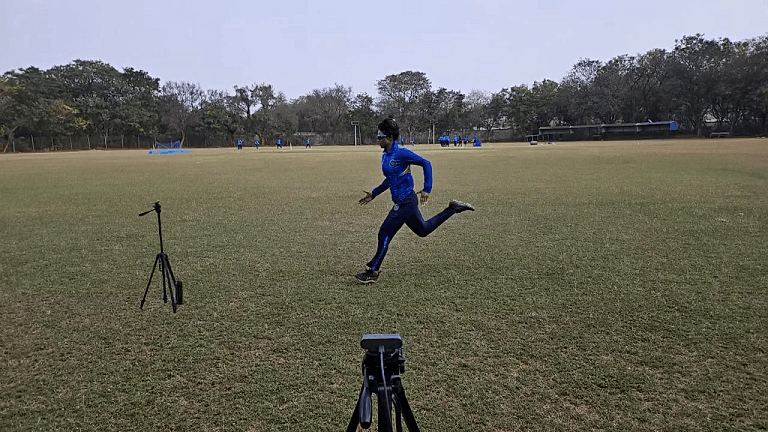
This blog will take us through a step by step process of conducting an outdoor running analysis and how it compares against traditional lab-based treadmill based running analysis.
Biomechanical running analysis is an integral component of modern athletic coaching. It is used to fine-tune running form, enhance performance efficiency, and support rehabilitation programs, particularly during return-to-sport phases after injury.
Typically, a running analysis is most commonly performed on a treadmill, which offers the benefit of controlled environmental variables—such as consistent surface, pace, incline, and ambient conditions. These controlled settings make it easier to capture high-quality, repeatable data, mainly when using tools like high-speed cameras, force plates integrated into treadmill decks, and motion capture systems.
However, while treadmills are ideal for standardization and lab-based assessments, they may not fully replicate real-world biomechanics. Treadmill running lacks natural elements such as wind resistance, surface variability, and the propulsive mechanics of self-paced movement.
Treadmill vs Outdoor Running
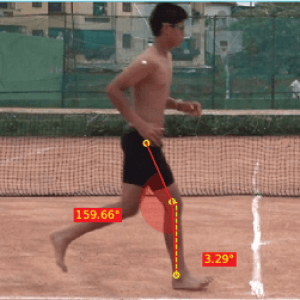
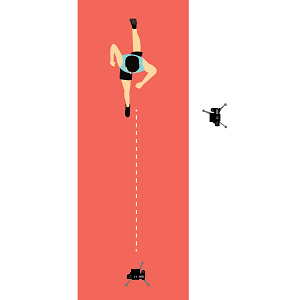
Overground Running
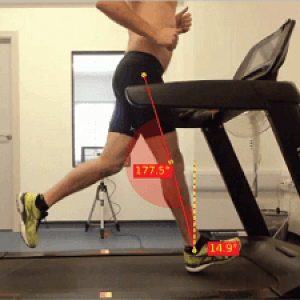
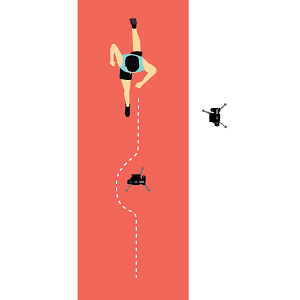
Treadmill Running
Evidence on differences between running on the treadmill and outdoor conditions show comparable results. Significant differences are primarily due to differences in surface stiffness, differences in running experience and comfort, restrictive belt dimensions due to smaller widths, altered speed perception and differences in air resistance.
The following are notable differences between treadmills vs outdoor running conditions
1. Spatiotemporal Parameters
Treadmill running shows shorter step length and higher cadence.
Stride and stance times are typically reduced.
Caused by the uniform speed and surface of the treadmill.
2. Kinematic Variations
Joint movements are mostly similar, but treadmill running shows:
Increased hip flexion
Reduced ankle dorsiflexion
Subtle pelvic and trunk changes
Likely due to the moving belt and lack of real forward motion.
3. Kinetics
Lower ground reaction forces (GRFs) and impact peaks on the treadmill.
Propulsive forces and loading rates are also reduced.
Results from the compliant treadmill surface.
4. Muscle Activation (EMG)
General activation patterns are similar.
Some studies note changes in timing/amplitude, especially in the gastrocnemius and hamstrings.
May require greater neuromuscular control due to fixed belt speed.
5. Treadmill-Specific Effects
Belt motion affects push-off and foot placement.
Runners show less forward lean and altered toe-off angles.
6. Adaptation Time
Biomechanical differences reduce with familiarity to a treadmill
Most runners adapt after a few sessions or minutes on the treadmill.
Hence, outdoor running analysis is recommended when it is necessary to assess a runner’s form in their habitual or real-world running environment for accuracy or performance relevance.
Conducting outdoor kinematic running analysis
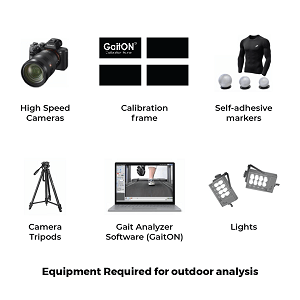
Equipment Required during outdoor running
Equipment Required
At least 2 High-speed cameras (120–240 fps minimum)
Tripod or stable camera mount
Calibration tools (e.g., scaling objects or reference frames)
Reflective markers or visible anatomical landmarks
Lighting setup (in case of low light)
Measurement software
Analysis Process
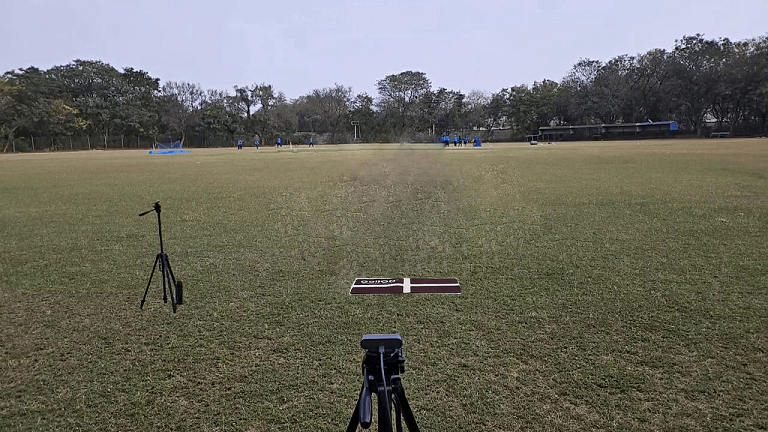
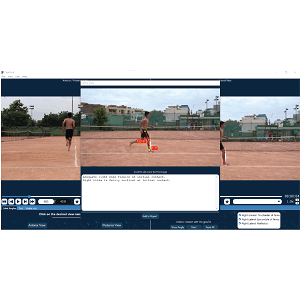
Step 1: Camera Positioning for outdoor running
Camera Layout 1
Camera Layout 2
Mount the camera on a relatively flat surface.
Place at least 2 cameras perpendicular to the sagittal and frontal planes of motion
Maintain a fixed camera height (to be set at pelvis height of runner) to minimize perspective distortion.
For lateral view, set the camera atleast 5 meters away from the running path such that atleast 2 to 3 strides of the runner are visible in the field of view.
For posterior view, there are 2 commonly used approaches for camera setup. The first approach involves placing the camera at the beginning of the running track as shown in the figure. The limitation of this approach is that by the time the runner acquires a natural running pattern, the runner is too far from the camera. This reduces marker visibility and makes it difficult to complete the analysis. A solution to this approach is using a telephoto lens which allows zooming in on far away objects with clarity. However, these cameras are often expensive.
Alternatively, the 2nd approach involves placing the posterior view camera close to the middle of the length of the running track. This method is useful for less powerful cameras as by the time runners reach the middle of the track, they have acquired a more natural running pattern, making it easy to do the analysis. The only limitation is that the runner needs to move around the camera to avoid colliding with it, which may affect running mechanics.
Step 2: Camera calibration for outdoor running
Place a known scale (e.g., meter stick or calibration frame) in the recording area. Ensure the frame lies as flat as possible to avoid distortion of lines
Align the camera’s gridlines with the calibration frame
A detailed procedure for this can be viewed here.
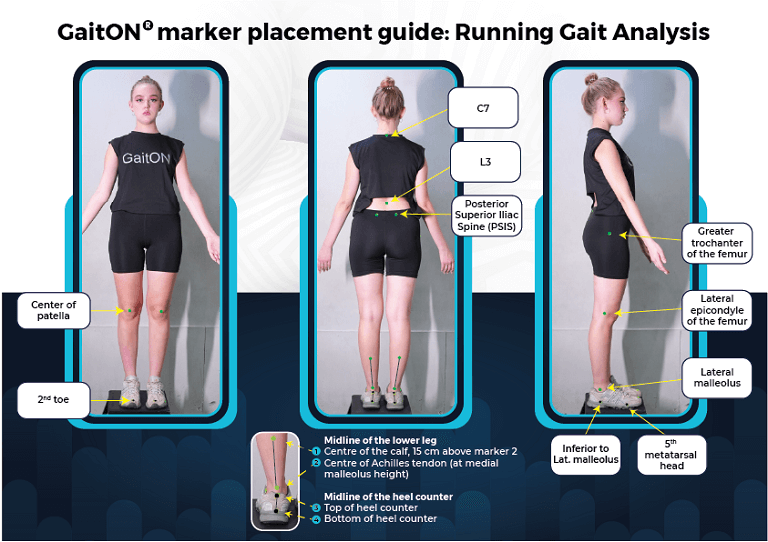
Step 3: Marker Placement for outdoor running
Mark anatomical landmarks with tape or stickers for more consistent tracking.
Step 4: Recording outdoor running trials
For lateral views, record multiple videos of runners passing by the cameras for repeatability.
For posterior view, the camera should be placed behind the runner, and they should start running away from it
In case of anterior view, the runner should run towards the cameras
Ensure the full body remains in the frame throughout the stride cycle.
Step 5: Analysis
Video import
Import video into motion analysis software and select trials in which the running phases are seen center to the camera’s view as much as possible
Marker Digitisation
Digitize joint centers frame by frame and extract parameters like joint angles, stride length, and cadence.
Report generation
Interpret with normative data for drawing conclusions
Conducting outdoor kinematic running analysis
Error
Cause
Impact
Parallax distortion
Camera not aligned perpendicularly
Skewed angle measurements
Perspective error
Subject moves out of plane
Inaccurate joint tracking
Lighting inconsistency
Poor or uneven lighting
Marker visibility issues
Frame drop or blur
Low frame rate or unstable camera
Missed peak motion moments
Marker occlusion
Body parts block key points
Incomplete data
Short capture window
Limited field of view
Partial gait cycle
Uncontrolled pacing
No fixed speed like a treadmill
Higher variability between trials
Camera shake
Unstable tripod
Blurred frames, poor tracking
While treadmill running analysis has its place in controlled lab settings, it may not always reflect how athletes move in the real world. That’s where outdoor running analysis—especially using 2D video—can provide deeper insights. Of course, it comes with its own challenges, like perspective errors and less control over pace. Still, with thoughtful setup and attention to detail, 2D outdoor motion capture remains an accessible tool for improving technique, mitigating injuries, and guiding return-to-sport decisions.
GaitON offers a comprehensive 2D analysis set-up to measure running gait, suitable for outdoor conditions!. To book a demo or get a running analysis done, contact us today
The information found within this site is for general information only and should not be treated as a substitute for professional advice from a licensed Physiotherapist. Any application of exercises and diagnostic tests suggested is at the reader’s sole discretion and risk.
ABOUT THE AUTHOR
GAYATRI SURESH (PT)
Gayatri Suresh (PT) is a Biomechanist who has completed her B.P.Th from DES College of Physiotherapy and M.P.T (Biomechanics) from SRM College of Physiotherapy, SRMIST. Her field of clinical expertise is in movement assessments through video analysis. Apart from her work at Auptimo, she works as a Clinical Specialist at Rehabilitation Research and Device Development, IIT Madras. She has been conferred with gold medals for her Research presentations and for securing First rank with distinction in her MPT degree respectively