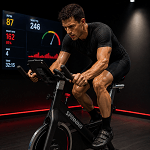
In most sports, the athlete moves freely through space. In cycling, the athlete is mechanically linked to the bicycle. When it comes to performance, it is important that the cyclist and the cycle are working efficiently as a single unit. A cycling performance analysis is a scientific process to test exactly that.
In a bike,
Feet are fixed to the pedals.
Pelvis is supported by the saddle.
Hands rest on the handlebar.
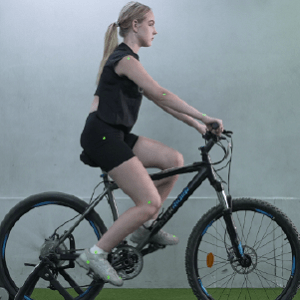
These contact points make cycling a constrained movement pattern. The bicycle decides the rider’s available posture.
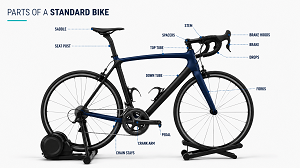
Saddle height affects knee and hip motion. Saddle setback affects the relationship between the pelvis and bottom bracket. Handlebar reach affects trunk angle and upper limb loading. Cleat position affects foot-pedal interaction. Crank length affects joint excursion. Cadence affects force demand per pedal stroke. Terrain and resistance affect torque production. Fatigue changes how well the cyclist can maintain position.
Types of Cycling and Their Characteristics
Cycling performance analysis should be adapted to the type of cycling performed, because each discipline has different biomechanical and physiological demands.

Road cycling
Extended rides with climbing, descending, cadence changes, and frequent position shifts.
Time trial cycling
Aerodynamic riding focused on power, comfort, and position sustainability.

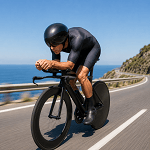
Triathlon cycling
Prioritizes aerodynamics while preserving running performance through comfort, efficiency, and fatigue management.
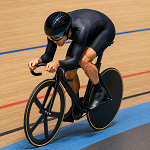
Track cycling
High-speed track cycling focused on peak power, acceleration, sprint stability, and high-cadence control.

Mountain biking
Off-road cycling requiring balance, stability, grip endurance, and control across varied terrain.

BMX cycling
Explosive cycling focused on acceleration, jumps, bike handling, power, and sprint control.
Indoor cycling / Spin cycling
Indoor cycling focused on cadence control, comfort, posture endurance, and sustained resistance.

Recreational cycling
Recreational cycling focused on comfort, endurance, efficient posture, and sustainable progression.
Components of a Cycling Performance Analysis
A cycling performance analysis must consider three systems together:
System | What it includes | Why it matters |
| Strength, mobility, control, endurance, anthropometry, fatigue profile | Determines physical capacity |
| Saddle, handlebar, cleats, crank, shoes, pedals, contact points | Determines mechanical constraints |
| Power, cadence, terrain, duration, discipline, fatigue, event demand | Determines performance requirement |
What Cycling Performance Analysis Should Measure
A cycling performance analysis should look at six major areas.
First, power production: how much force the cyclist can produce and how this changes across intensities.
Second, power transfer: how effectively force is transferred through the pelvis, lower limb, foot, and pedal.
Third, position sustainability: whether the cyclist can maintain trunk, pelvis, shoulder, and head position during longer efforts.
Fourth, cadence and torque strategy: whether the cyclist performs better with higher cadence, lower cadence, high torque, or faster leg speed.
Fifth, fatigue behaviour: how technique changes when the cyclist is no longer fresh.
Sixth, aerodynamic and biomechanical compromise: whether a more aggressive position actually improves performance or simply makes the cyclist look faster.
A Complete Cycling Performance Analysis Protocol
Step 1: Define the Performance Question
Before measuring anything, define why the cyclist is being assessed.
The cycling performance analysis should begin with one clear question.
For example:
“Can this cyclist sustain their current riding position for long-distance performance?”
“Why does power drop during climbs?”
“Is the aero position helping or reducing performance?”
“Does the cyclist lose efficiency under fatigue?”
“Which physical qualities are limiting cycling output?”
“Is the current bike setup supporting the rider’s performance goal?”
Once the performance question is clear, the protocol becomes easier to design.
Step 2: Take a Performance-Focused Cycling History
A strong intake should capture:
Area | What to ask |
Cycling discipline | Road, track, MTB, triathlon, recreational, indoor |
Performance goal | Endurance, climbing, sprinting, time trial, return to training |
Training profile | Weekly hours, distance, intensity, terrain, longest ride |
Performance markers | FTP, peak power, average speed, race results, cadence preference |
Equipment history | Bike, saddle, cleats, shoes, crank length, handlebar setup |
Recent changes | Load increase, position change, new equipment, terrain change |
Body status | Fatigue, recovery, sleep, soreness, pain, previous injury |
Step 3: Profile the Cyclist Off the Bike
The off-bike screen answers one question:
What physical qualities does the cyclist bring to the bicycle?
Cycling is highly repetitive and mostly sagittal-plane dominant, but good cycling performance still requires strength, mobility, trunk control, endurance, and the ability to maintain posture under fatigue.
Hip mobility matters because the cyclist repeatedly moves through hip flexion and extension while maintaining trunk position. Thoracic mobility matters because the cyclist must hold a forward-leaning posture while still looking ahead. Trunk endurance matters because the pelvis must remain stable while the legs generate alternating force. Calf capacity matters because the ankle contributes to force transfer and pedal control. Upper limb endurance matters because the hands and shoulders help support and stabilize the rider.
Important areas to assess include:
Domain | Assessment |
Anthropometry | Height, body mass, limb length, sitting height if relevant |
Mobility | Hip flexion, hip extension, ankle dorsiflexion, thoracic extension, cervical extension |
Strength | Quadriceps, hamstrings, hip extensors, hip abductors, calf strength |
Trunk capacity | Plank, side plank, trunk extensor endurance, anti-rotation control |
Movement control | Single-leg squat, step-down, hip hinge, pelvic control |
Upper body | Scapular endurance, shoulder position, wrist tolerance, grip if relevant |
Step 4: Document the Bicycle Setup
This includes saddle height, saddle setback, saddle tilt, handlebar reach, handlebar drop, stem length, handlebar width, crank length, shoe type, pedal type, cleat position, cleat rotation, and cleat float.
Photographs from the side, front, and rear are useful. Side-view photographs help document saddle and handlebar relationship. Rear-view images help understand pelvis, saddle, and lower-limb alignment. Close-up images of cleats and shoes are useful if foot-pedal mechanics need to be interpreted.
Step 5: Prepare the Dynamic Cycling Performance Analysis
The cyclist should ideally be assessed on their own bicycle, using their usual shoes, cleats, saddle, riding shorts, and handlebar position.
The equipment required are: A stationary trainer, two cameras/smartphones, tripods, cadence data, power data, heart rate, and RPE. More advanced setups may include smart trainers, motion analysis software, pressure mapping, EMG, metabolic testing, or instrumented pedals.
The important requirement is standardization.
The cyclist should warm up before video recording. Many riders do not show their natural pedalling pattern immediately. A warm-up of 8–10 minutes, followed by a few short cadence and intensity changes, usually gives a more realistic movement pattern.
Record the testing conditions:
- Power output
- Cadence
- Heart rate
- RPE
- Gear or resistance mode
- Hand position
- Riding position
- Duration of each block
- Any discomfort or fatigue reported
Step 6: Record the Cyclist From the correct Views
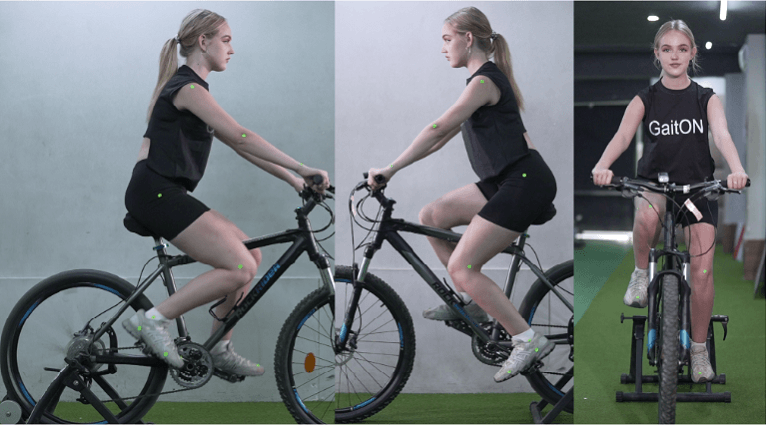
Cycling performance analysis needs more than one camera angle.
The minimum recommended views are:
View | What it assesses |
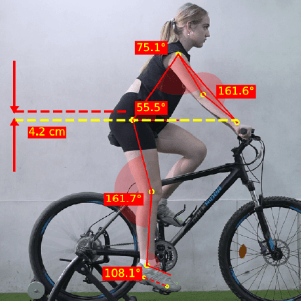
Side view | Trunk angle, hip angle, knee flexion, ankle strategy, shoulder-elbow-wrist position |
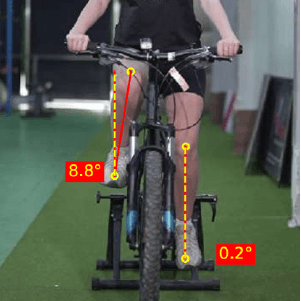
Rear view | Pelvic movement, knee path, foot position, symmetry, upper body sway |
Front/oblique view | Shoulder position, hand loading, trunk rotation, knee tracking |
Aero/discipline-specific view | Time-trial posture, climbing posture, sprint posture, drops/hoods/aero bars |
For road cyclists, assess riding on the hoods and drops if both are relevant. In case of triathletes, assess the aero position. Further, for climbers, include seated climbing simulation. Finally, in case of sprinters, assess higher-power efforts rather than only steady-state riding.
The camera angle should match the performance question.
Step 7: Test More Than One Intensity
Cycling mechanics change when power changes. They also change when cadence changes. They change again when the cyclist becomes tired.
A useful performance protocol should include four blocks.
1. Baseline Endurance Block
The cyclist rides at a comfortable endurance intensity using their natural cadence. This shows their default movement pattern.
Record power, cadence, heart rate, RPE, and video.
2. Cadence Ladder
At a fixed low-to-moderate power, ask the cyclist to ride at different cadences such as 60, 75, 90, and 105 rpm.
This helps identify whether the cyclist controls movement better at low cadence or high cadence. Low cadence increases force demand per pedal stroke. Higher cadence reduces force per stroke but increases leg speed and cardiovascular demand. There is no universal perfect cadence; the best cadence depends on the rider, event, terrain, fatigue state, and performance goal.
3. Power Ladder
At a self-selected cadence, gradually increase power across easy, moderate, tempo, and high-intensity efforts.
This helps identify when technique changes. Some cyclists remain stable at low power but start rocking through the pelvis at higher power. Others increase upper body tension, alter knee path, lose ankle control, or bounce on the saddle.
4. Fatigue or Event-Specific Block
A cyclist may look technically good when fresh, but the relevant question is whether they can maintain that technique when the ride becomes demanding.
For endurance riders, include a longer steady block. In case of climbers, include a low-cadence high-torque block. Further, for sprinters, include short maximal or near-maximal efforts. Finally, for triathletes, assess the aero position for a duration long enough to reveal whether it is sustainable.
Step 8: Analyse the Main Performance Variables
Once video and performance data are collected, interpretation should begin with the major performance variables.
Pelvic Stability
The pelvis is central to cycling performance because it links the trunk to the lower limbs. A stable pelvis allows the legs to produce force against a relatively controlled base.
Excessive pelvic rocking may indicate saddle height issues, poor trunk control, fatigue, poor hip control, or a position the cyclist cannot sustain. A cyclist who rocks excessively may lose efficiency because energy is being spent on unnecessary movement rather than pedal force.
Trunk Position
The trunk must balance aerodynamics, breathing comfort, power production, and upper limb loading.
A lower trunk angle may improve aerodynamic potential, especially in racing or time-trial positions. However, if the position closes the hip angle too much, reduces breathing comfort, increases upper limb loading, or reduces sustainable power, the position may not improve real performance.
Trunk analysis should include:
- Can the cyclist maintain the position without excessive movement?
- Trunk collapsing under fatigue?
- Is breathing restricted?
- Rider compensating through shoulder elevation or locked elbows?
- Position remain sustainable at higher power?
Hip and Knee Motion
Hip and knee angles influence force production, comfort, and pedalling mechanics.
Saddle height is one of the more studied bike-fit variables. A commonly discussed dynamic range is around 25–30° of knee flexion near the bottom of the pedal stroke, but this is not a universal rule. The cyclist’s symptoms, pelvic control, power output, pedalling style, and event demands all matter.
A saddle that is too low may create a cramped pedalling pattern and increase knee flexion demands. A saddle that is too high may lead to toe-pointing, pelvic rocking, or loss of control at the bottom of the stroke.
Knee Path
Knee tracking is commonly discussed in cycling, but it is often overinterpreted.
A small amount of medial or lateral knee movement is not automatically a performance problem. The question is whether the movement is excessive, asymmetrical, unstable, associated with loss of power, or worsens under fatigue.
Knee path should be interpreted with hip control, foot position, cleat setup, saddle position, cadence, and power.
A cyclist may show acceptable knee control at endurance pace but lose control during high-torque efforts. In that case, the issue is not simply “knee alignment.” It may be high-force control.
Ankle Strategy
The ankle contributes to force transfer between the body and the pedal.
Some cyclists pedal with a more toe-down strategy. Others show more heel drop. Neither is automatically right or wrong. What matters is whether the ankle strategy is controlled, symmetrical enough for the rider, and appropriate for the task.
Observe whether ankle position changes with power, cadence, or fatigue. Excessive toe-pointing may sometimes appear when the saddle is too high or when the cyclist is reaching for the pedal. Excessive heel drop may appear during high-torque efforts. Loss of ankle control under fatigue may reduce pedalling efficiency.
Upper Body Loading
The hands, shoulders, trunk, and neck help the cyclist maintain position while the legs generate alternating force. Excessive hand pressure, locked elbows, elevated shoulders, or excessive trunk sway may suggest that the rider is using the upper body to compensate for poor position or poor trunk control.
In performance cycling, unnecessary upper body tension can waste energy. During longer rides, it may also reduce comfort and position sustainability. Handlebar drop and reach is an effective way to modify upper body loads.
Step 9: Interpret Power, Cadence, and Movement Together
Useful interpretation questions include:
Question | Why it matters |
| Shows high-intensity control |
| Shows torque versus leg-speed preference |
| Shows sustainability |
| Shows whether fit supports performance |
| Suggests improved efficiency |
| Gives practical performance feedback |
Step 10: Re-Test Under the Same Conditions
Re-testing allows us to check progress and effectiveness of an intervention. The conditions for re-testing should be as similar to the first testing as possible to collect accurate and reliable data.
The most useful outcome markers include:
Marker |
|
Sustainable power | Whether output improves |
RPE at same power | Whether the task feels easier |
Cadence stability | Whether rhythm improves |
Pelvic/trunk control | Whether unnecessary movement reduces |
Position tolerance | Whether the rider can sustain posture |
Heart rate response | Whether physiological strain changes |
Fatigue behaviour | Whether technique holds for longer |
Post-session response | Whether the position is tolerated |
Practical Cycling Performance Analysis Template
A practical session may follow this sequence:
Stage | What to do | Purpose |
1. Goal setting | Identify event, discipline, performance issue, and training goal | Defines cycling performance analysis direction |
2. Cycling history | Record training load, cadence, terrain, equipment, recent changes | Provides performance context |
3. Off-bike screen | Assess mobility, strength, trunk control, movement capacity | Profiles rider capacity |
4. Bike documentation | Record saddle, handlebar, crank, cleats, shoes | Defines mechanical setup |
5. Warm-up | 8–10 minutes with light cadence/intensity changes | Allows natural movement |
6. Baseline block | Comfortable endurance effort | Shows default pattern |
7. Cadence ladder | 60, 75, 90, 105 rpm at controlled power | Shows cadence response |
8. Power ladder | Easy to high intensity | Shows power-related movement change |
9. Event-specific block | Climb, sprint, aero, endurance, or fatigue block | Matches real demand |
10. Interpretation | Connect movement, power, cadence, fatigue, and position | Identifies performance limiter |
11. Intervention | Bike, technique, strength, conditioning, or load changes | Targets limiting factor |
12. Re-test | Repeat the same condition | Confirms response |
GaitON offers an easy and simple method to assess cycling kinematics and bike fit. Contact us below to book a demo!
ABOUT THE AUTHOR

GAYATRI SURESH (PT)
Gayatri Suresh (PT) is a Biomechanist who has completed her B.P.Th from DES College of Physiotherapy and M.P.T (Biomechanics) from SRM College of Physiotherapy, SRMIST. Her field of clinical expertise is in movement assessments through video analysis. Apart from her work at Auptimo, she works as a Clinical Specialist at Rehabilitation Research and Device Development, IIT Madras. She has won gold medals for her Research presentations and for securing First rank with distinction in her MPT degree respectively.
The information found within this site is for general information only and should not be treated as a substitute for professional advice from a licensed medical practitioner. Any application of exercises and diagnostic tests suggested is at the reader’s sole discretion and risk.
References: Part 1
- Bini R, Hume PA, Croft JL. Effects of bicycle saddle height on knee injury risk and cycling performance. Sports Med. 2011 Jun 1;41(6):463-76. doi: 10.2165/11588740-000000000-00000. PMID: 21615188.
- Bini R, Priego-Quesada J. Methods to determine saddle height in cycling and implications of changes in saddle height in performance and injury risk: A systematic review. J Sports Sci. 2022 Feb;40(4):386-400. doi: 10.1080/02640414.2021.1994727. Epub 2021 Oct 27. PMID: 34706617.
- Bini RR, Tamborindeguy AC, Mota CB. Effects of saddle height, pedaling cadence, and workload on joint kinetics and kinematics during cycling. J Sport Rehabil. 2010 Aug;19(3):301-14. doi: 10.1123/jsr.19.3.301. PMID: 20811079.
- Faulkner, S.H., Jobling, P., Griggs, K.E. et al. Individual aerodynamic and physiological data are critical to optimise cycling time trial performance: one size does not fit all. Sports Eng 27, 4 (2024). https://doi.org/10.1007/s12283-023-00446-0.
References: Part 2
- Holliday W, Theo R, Fisher J, Swart J. Cycling: joint kinematics and muscle activity during differing intensities. Sports Biomech. 2023 May;22(5):660-674. doi: 10.1080/14763141.2019.1640279. Epub 2019 Sep 2. PMID: 31475880.
- Husband SP, Wainwright B, Wilson F, Crump D, Mockler D, Carragher P, Nugent F, Simms CK. Cycling position optimisation – a systematic review of the impact of positional changes on biomechanical and physiological factors in cycling. J Sports Sci. 2024 Aug;42(15):1477-1490. doi: 10.1080/02640414.2024.2394752. Epub 2024 Sep 16. PMID: 39285616.
- Riveros-Matthey CD, Carroll TJ, Lichtwark GA, Connick MJ. The effects of crank power and cadence on muscle fascicle shortening velocity, muscle activation and joint-specific power during cycling. J Exp Biol. 2023 Jul 1;226(13):jeb245600. doi: 10.1242/jeb.245600. Epub 2023 Jul 12. PMID: 37326292; PMCID: PMC10357033.
- Verma R, Hansen EA, de Zee M, Madeleine P. Effect of seat positions on discomfort, muscle activation, pressure distribution and pedal force during cycling. J Electromyogr Kinesiol. 2016 Apr;27:78-86. doi: 10.1016/j.jelekin.2016.02.003. Epub 2016 Feb 17. PMID: 26938676.
- Scoz RD, Amorim CF, Espindola T, Santiago M, Mendes JJB, de Oliveira PR, Ferreira LMA, Brito RN. Discomfort, pain and fatigue levels of 160 cyclists after a kinematic bike-fitting method: an experimental study. BMJ Open Sport Exerc Med. 2021 Aug 30;7(3):e001096. doi: 10.1136/bmjsem-2021-001096. PMID: 34540268; PMCID: PMC8407214.